Managing the contents of the contract
When initial set up is complete, add the Additional Information, including the Funding Schedule. The Additional Information form allows you to fill out the sections of the contract.
To manage the contents of the contract:
-
Click the Contents Management tab.
-
Click Additional Information.

-
Click Edit.

-
Select the Risk Profile.
- Focused (low value / high risk contracts)
- Leveraged (high value / low risk contracts)
- Routine (low value / low risk contracts)
- Strategic (high value / high risk contracts)
-
Enter the Related RFx Number.
Tip Use the format rfq_123 or enter NA if no RFQ is applicable to this contract.
-
Enter the associated FSD Services Agreement Number.
Note If no funding and service details has been created, set one up using the Social Services Procurement - FSD project template. Refer to Set up a funding and service details.
If this funding schedule is new to an existing Funding and Services Details, follow the procedure for attaching the signed variation and funding schedule to the Funding and Services Details.
Warning FSD Services Agreement Number is important as it is used by P2i reports when reporting on linked contracts and displays within the Funding Schedule.
FSD Services Agreement Number becomes more important to be correctly populated due to a workaround where the contract's Link > Contract Relationships to the FSD may be removed if the FSD has reached the P2i system limit of 100 links.
Refer to Link the FS to an FSD.
-
Enter the contract Establishment Date.
-
Enter the FMA Approved End Date.
-
Do not enter the Execution Date at this time.
Note The Execution Date is the last signature date on the service agreement. This is to be entered by the P2i Contract Officer as part of the Attach and activate contract task.

-
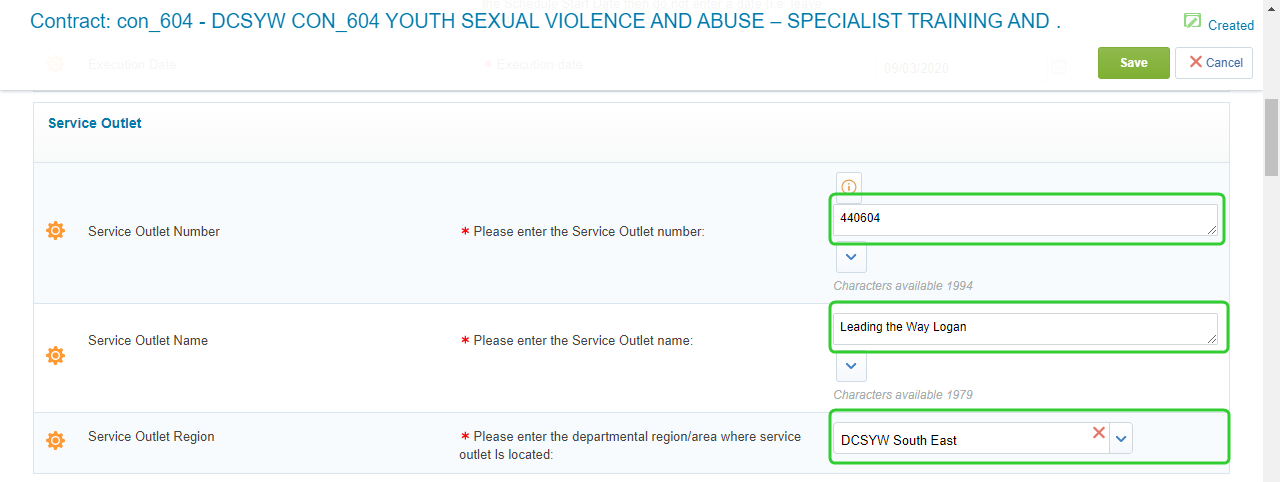
Enter the details of the Service Outlet.
Tip The Service Outlet Number consists of the Project Code and the Contract Code to create a unique number.
-
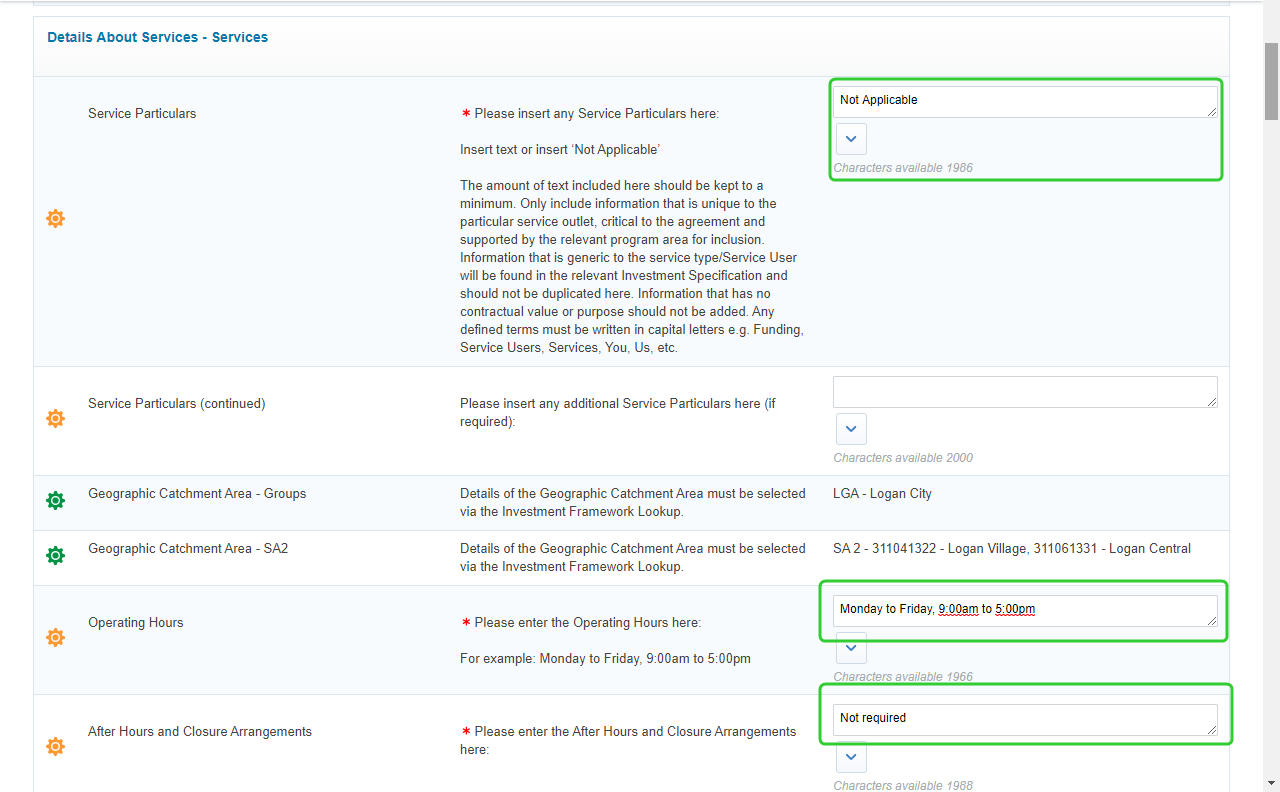
Enter the Service Particulars, if applicable.
-
Enter the operating hours and after hours and closure arrangements.
-
Scroll down and enter the Service Delivery Requirements.
-
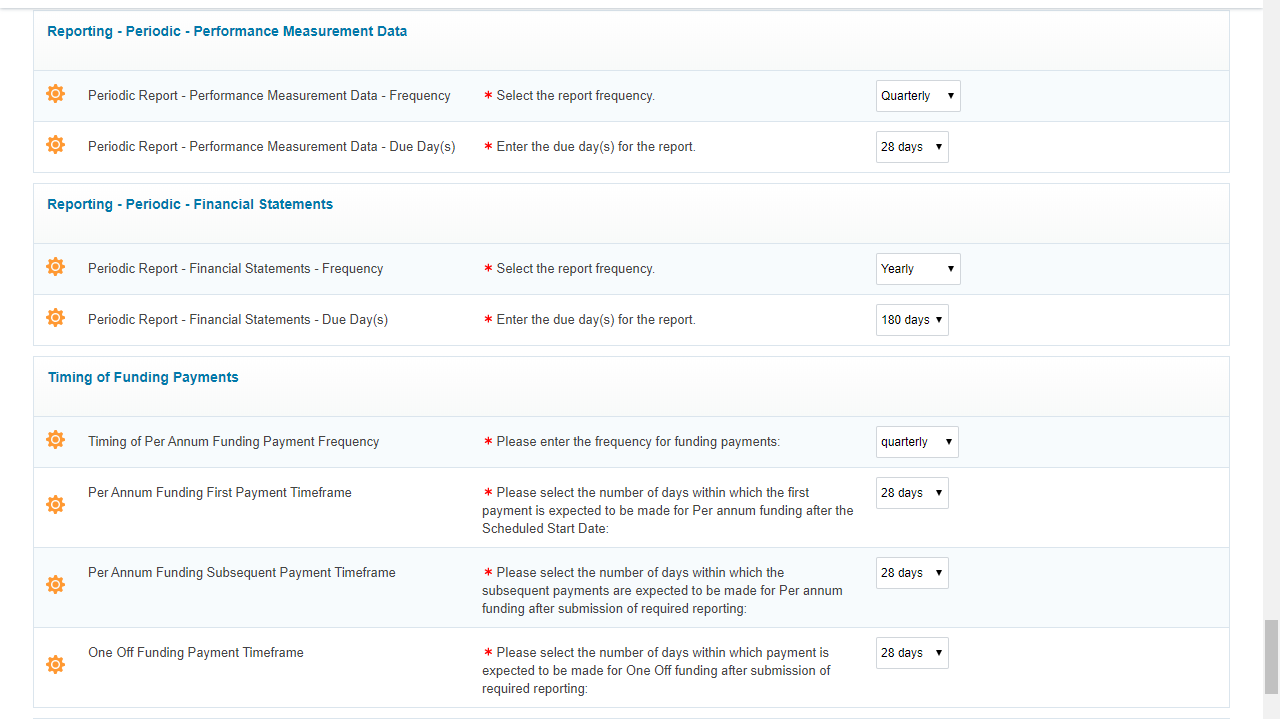
Select any periodic reports and non-periodic reports.
Tip If your Client Management Data report is not available in the list, select any of the options available. Find and Replace the report type you have chosen with the correct report once the contract has been generated.

-
Select the report frequency and due day(s) for the selected reports.
-
Enter the timing of funding payments.
-
Enter any special conditions if applicable.
-
Enter any attachment details if applicable.
Note Please enter the:
**Attachment number (e.g. 1, 2, etc.); or ‘Not Applicable’
**Attachment name
**Attachment referencePlease enter each attachment set in this format:
Attachment Number: <Details>
Attachment Name: <Details>
Attachment Reference: <Details> -
Click Save.

Note The Risk Profile options are selected based on the outcomes of the Value Risk Matrix.
Warning Only insert a date if the Services under the Funding Schedule are new with an approved establishment or start-up period later that the Schedule Start Date.
The Establishment Date is the date by which the services must be operational (i.e. doors open). If the Services are existing Services or new Services that are to commence delivery from the Schedule Start Date then do not enter a date (i.e. leave blank).
Note Please enter the:
**Document Name - (Insert name and the version number)
**Document Section - (It is very important that the correct sections are referenced here. That is, the sections referenced must relate to the service type and Service Users specified at items 6.1 & 6.2) of each document that needs to be referenced in the Service Delivery Requirements here:
Please enter each pair of data in the format of:
Document Name
Document Section
Where located

Tip For non-periodic reports, enter the description for the report.
Note The next step in setting up the funding schedule is to attach any approved contract set up documents. Refer to the topic Attach approved contract set up documents to a funding schedule.